Building a Serverless URL Shortener using Lambda, S3 and Cloudfront
I’ve been tinkering with the AWS cloud for about an year now, and I went ahead and got the AWS CSAA certificate too. But most of my AWS experience has been small edits to an already existing architecture, and that too for clients with their projects being closed source. I realized I don’t have a solid end-to-end cloud project that I can showcase in my portfolio, and I need one. So that’s how this project came to be. Moreover, through this project I learnt the serverless framework and got more comfortable with Cloudformation templates. So let’s get into it.
The Architecture Diagram
Here’s a simple architecture diagram I made of the whole setup. Because, a picture is worth a thousand words or something like that.
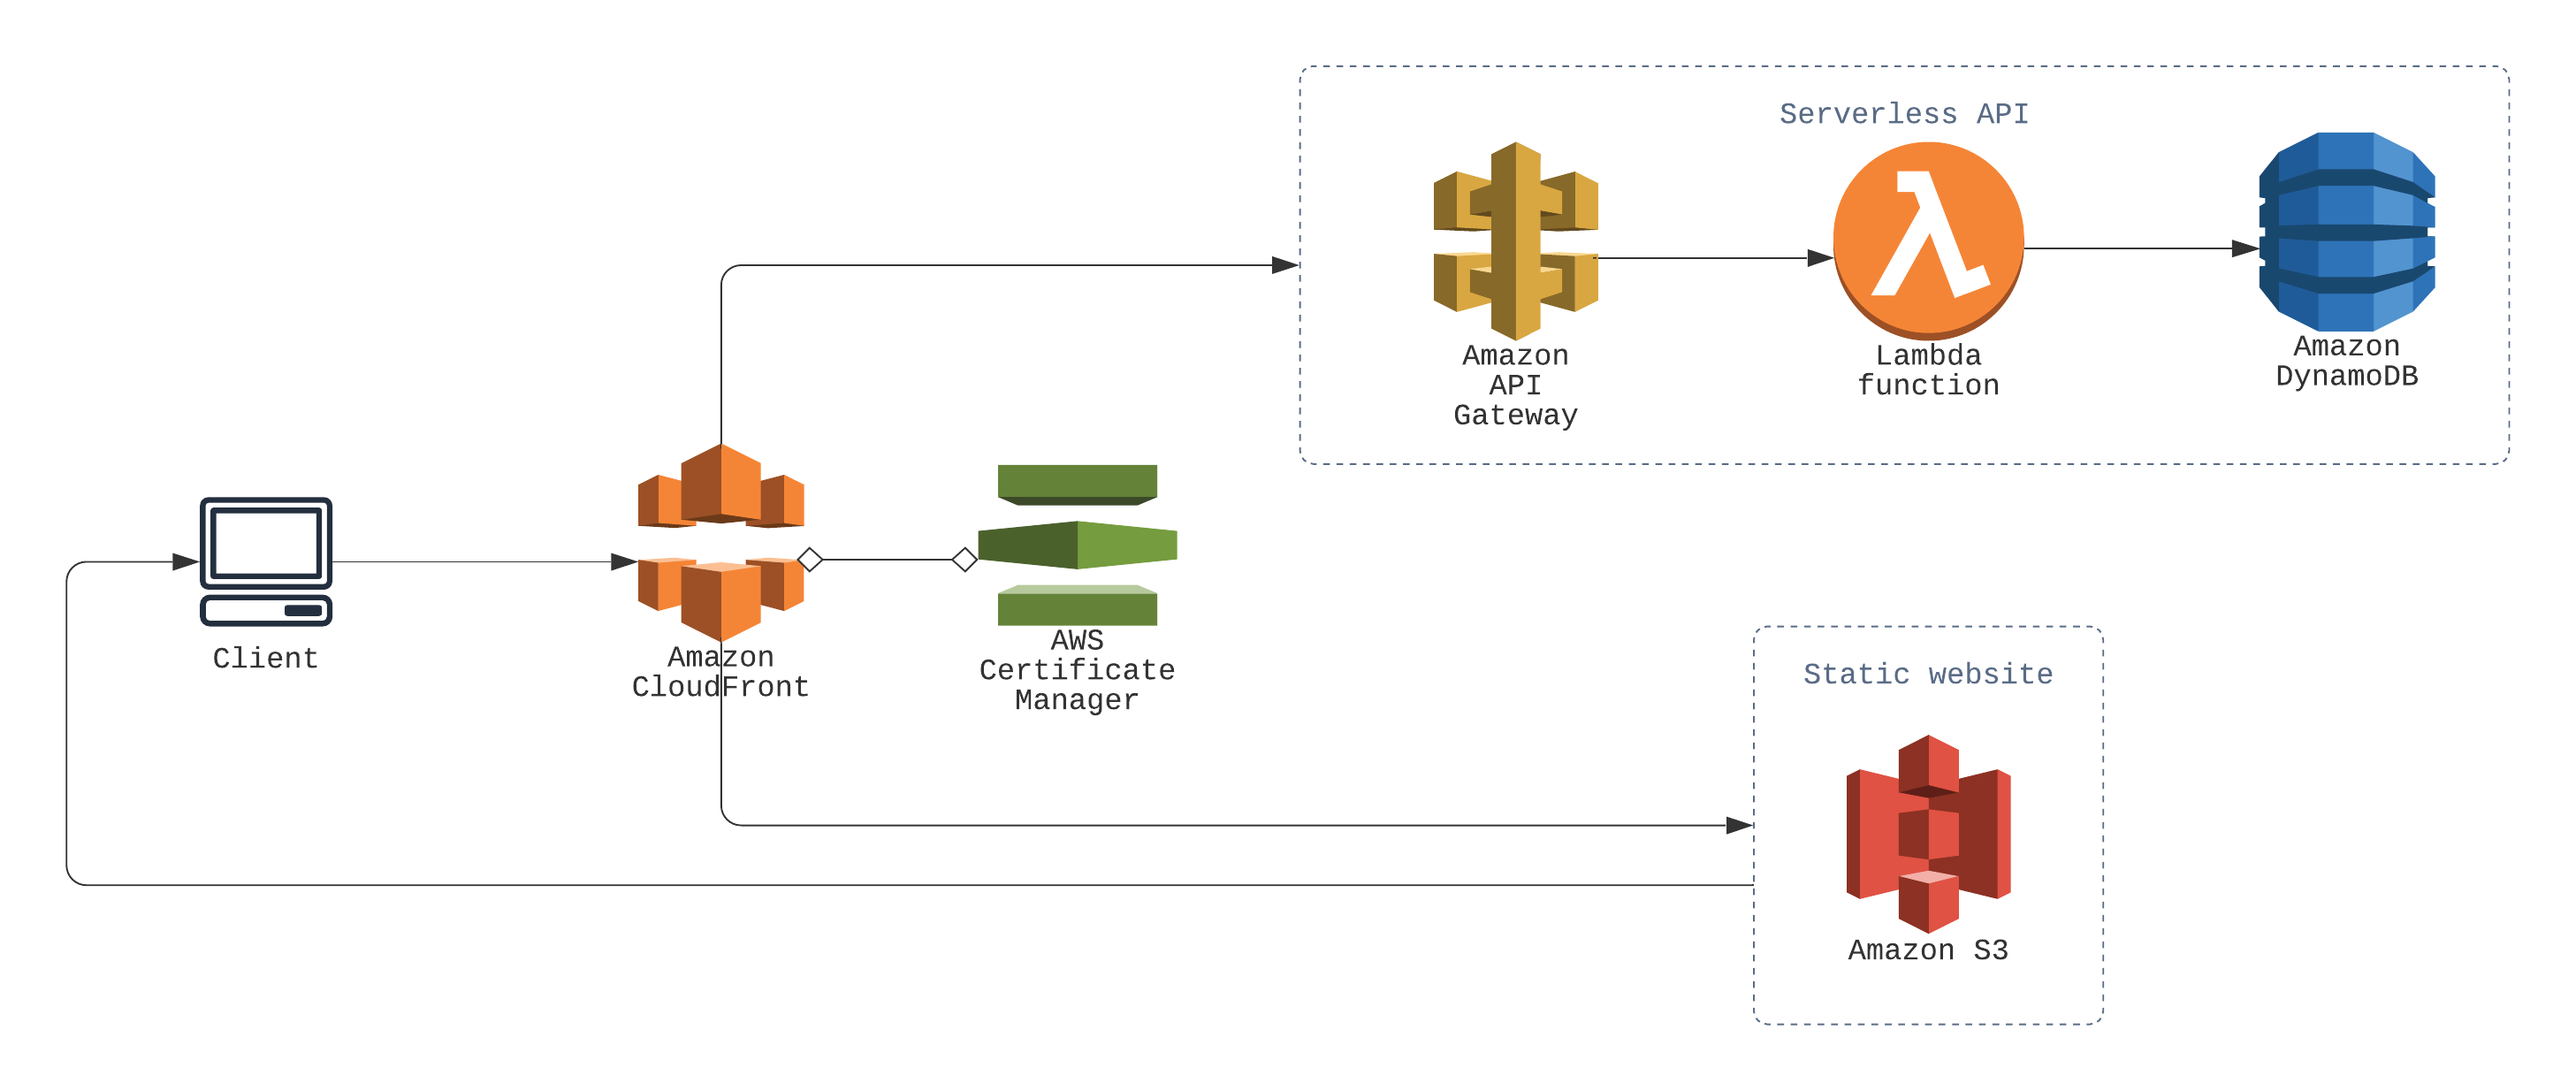
I set out to accomplish a very common pattern—serverless API on the backend utilising Lambda and DynamoDB, and static website on the frontend hosted using S3. And it was easy enough, but the hard part was getting them working on the same domain, I’ll get to that later, let’s first go through the easy part first.
- Note — You can find the full source code of the application on Github here, you can refer to that as you go through the article.
Serverless Backend using Lambda and DynamoDB
The serverless framework makes this part a breeze. I followed this tutorial from their blog, my code is basically the same with the Flask functions swapped out. The API uses the Lambda proxy integration, with the whole of the Flask application being used as a single Lambda function. This pattern has both pros and cons,
- It lets you use existing frameworks for the back-end application, such as Flask. This makes development easier.
- If the application becomes large in size, it can result in slower Lambda invocations. Also there is a limit to the file size you can upload as a Lambda package, so keep that in mind too.
For smaller applications like ours, the cons become negligible, so it’s a suitable method for deploying our application.
The backend also uses several serverless plugins to ease development and deployment.
- It uses
serverless-python-requirementsfor packaging requirements of the python application. It takes a look at therequirements.txtfile and accordingly bundles the requirements into the lambda deployment package when you runsls deploy. serverless-wsgienables us to use a normal Flask application, containing traditional view functions, and upload it to Lambda directly. It acts as a layer between the Python’swsgiinterface and the Lambda proxy integration interface. It also comes with a local development mode,sls wsgi serveruns the application locally.- Similarly,
serverless-dynamodb-localhelps us to do local development with DynamoDB.
Static Frontend with Swagger API Documentation using S3
For deploying the front-end part of the application to S3, I used the serverless-finch plugin. It makes the whole process completely hassle-free, you’ll need to configure only one or two parameters in your serverless.yml file to get up and running.
The frontend is a simple one-page website made using Bootstrap, and to handle the form submission I wrote some custom JS. I also added a Swagger UI page as an interactive documentation for my API. If you didn’t know what Swagger is, it’s an excellent API documentation tool. It requires an yml file containing the details about your API—written in the OpenAPI specification—and it creates a fully interactive documentation web page just from that. You don’t even need to read the whole specification to get started, Swagger has a great editor for creating the API specification, including a sample which you can just edit to your need.
Routing using Cloudfront
Now comes the tricky part. I wanted to host both the frontend and the backend on different paths in the same domain. For example, https://shorty.skghosh.me/api would get directed to the API Gateway, and https://shorty.skghosh.me/ would get sent to the S3 static site. Not only that, shortened URL links such as https://shorty.skghosh.me/vv3c1v should get sent to the Flask application too. This makes a bit complicated and involved. If I were to host the API on a different subdomain entirely, for example api.shorty.skghosh.me, the whole thing could be set up just using appropriate DNS records, but my use case would need a bit more engineering.
After several stack overflow answers and blog posts, I understood that Cloudfront is the right tool to solve this problem. In particular, this stack overflow snippet and this blog post helped me a lot, and of course, the AWS docs. Also, there isn’t any magic serverless plugin to do this step, so I had to write the Cloudformation resource by hand. Let’s look at it.
CloudfrontDistribution:
  Type: AWS::CloudFront::Distribution
  Properties:
    DistributionConfig:
      Aliases:
        - shorty.skghosh.me
      Origins:
        - DomainName: ${self:custom.client.bucketName}.s3-website.${self:provider.region}.amazonaws.com
          Id: StaticS3Origin
          CustomOriginConfig:
            OriginProtocolPolicy: http-only
        - DomainName:
            Fn::Join:
              - ""
              - - Ref: ApiGatewayRestApi
                - ".execute-api."
                - Ref: AWS::Region
                - ".amazonaws.com"
          Id: APIOrigin
          CustomOriginConfig:
            OriginProtocolPolicy: https-only
          OriginPath: /dev
      Enabled: true
      DefaultCacheBehavior:
        TargetOriginId: StaticS3Origin
        ForwardedValues:
          QueryString: false
          Cookies:
            Forward: none
        ViewerProtocolPolicy: redirect-to-https
      CacheBehaviors:
        - PathPattern: /swagger*
          TargetOriginId: StaticS3Origin
          ForwardedValues:
            QueryString: false
            Cookies:
              Forward: none
          ViewerProtocolPolicy: redirect-to-https
        - PathPattern: /static*
          TargetOriginId: StaticS3Origin
          ForwardedValues:
            QueryString: false
            Cookies:
              Forward: none
          ViewerProtocolPolicy: redirect-to-https
        - PathPattern: /api/?*
          TargetOriginId: APIOrigin
          ForwardedValues:
            QueryString: true
            Headers: [Accept, Referer, Authorization, Content-Type]
            Cookies:
              Forward: none
          ViewerProtocolPolicy: redirect-to-https
          AllowedMethods: [DELETE, GET, HEAD, OPTIONS, PATCH, POST, PUT]
          MinTTL: "0"
          DefaultTTL: "0"
        - PathPattern: /?*
          TargetOriginId: APIOrigin
          ForwardedValues:
            QueryString: true
            Headers: [Accept, Referer, Authorization, Content-Type]
            Cookies:
              Forward: none
          ViewerProtocolPolicy: redirect-to-https
          AllowedMethods: [DELETE, GET, HEAD, OPTIONS, PATCH, POST, PUT]
          MinTTL: "0"
          DefaultTTL: "0"
      ViewerCertificate:
        AcmCertificateArn: arn:aws:acm:us-east-1:680499645329:certificate/6fbcfddc-3351-47fc-9ebe-f3d88abc444f
        SslSupportMethod: sni-only
        MinimumProtocolVersion: TLSv1.2_2018
      PriceClass: PriceClass_100
In short, I declared two Origins, one for the API, and another for the S3 static site. And then added the proper CacheBehaviors. There are some nuances that you have to get exactly right, otherwise it wouldn’t just work. I wouldn’t go through all of them here; but if you’re trying to replicate my setup, make sure you got all the parameters in the Cloudformation template correctly, even the seemingly trivial ones. I’ll list the ones I had trouble with
- The S3 static website origin must have its
OriginProtocolPolicyset tohttp-only. - For the API origin, pay attention to
ForwardedValues,AllowedMethods,MinTTLandDefaultTTL. - Make sure you got the order of the
CacheBehaviorscorrect, the ones you declare first will have greater priority over the others—AWS starts matching thePathPatternfrom the top, as soon as it finds a match it directs the request to that. A rule of thumb is, the more specific aPathPatternis, the higher up it should be.
Adding a Custom Domain
Adding a custom domain requires some manual steps. You have to go to AWS Certificate Manager and create a certificate for your domain. Make sure it’s in the us-east-1 region, otherwise you wouldn’t be able to use it with Cloudfront. Once you have created and verified your certificate, add the ViewerCertificate and Aliases parameters to the Cloudfront resource. The last step would be adding a CNAME or ALIAS record in your domain registrar, binding your custom domain with your Cloudfront distribution domain.
Conclusion
- The final website is hosted @ https://shorty.skghosh.me
- The API documentation is available @ https://shorty.skghosh.me/swagger
- The source is available @ Github. Please star it if you find it useful, and feel free to fork, make an issue, send a pull request, all of that.
This was a exciting learning exercise for me, so I couldn’t wait to share it with everyone. I hope the post helps you too, in whatever way it can. Make sure to leave a comment if you have any feedback or question, I’ll try my best to get back to you.