Building a Serverless Price Tracker for Amazon and Flipkart using AWS
The prices on online shopping sites such as Amazon and Flipkart change a lot, and that too quite frequently. This can be both positive and negative: on the upside, if you’re vigilant you can grab some lucrative deals, the downside is that if you’re not careful you might end up buying something at a rate higher than the normal. Tools like Keepa can be handy in this regard, it shows you a graph of the price history of a particular product so that you can make a good decision. Keepa can even send you an alert in case the price goes down! But I’ve found Keepa can be a bit unreliable; it seems to track the prices at a much coarser granularity, as a result it can miss some short-lived deals. Also it doesn’t track all products, only the popular ones.
So I decided to build something like it myself, just the bare-bones, mostly for my own usage. In this post I’m going to share in detail how I built it, including the architecture choices I made and why I made them.
The Architecture Overview
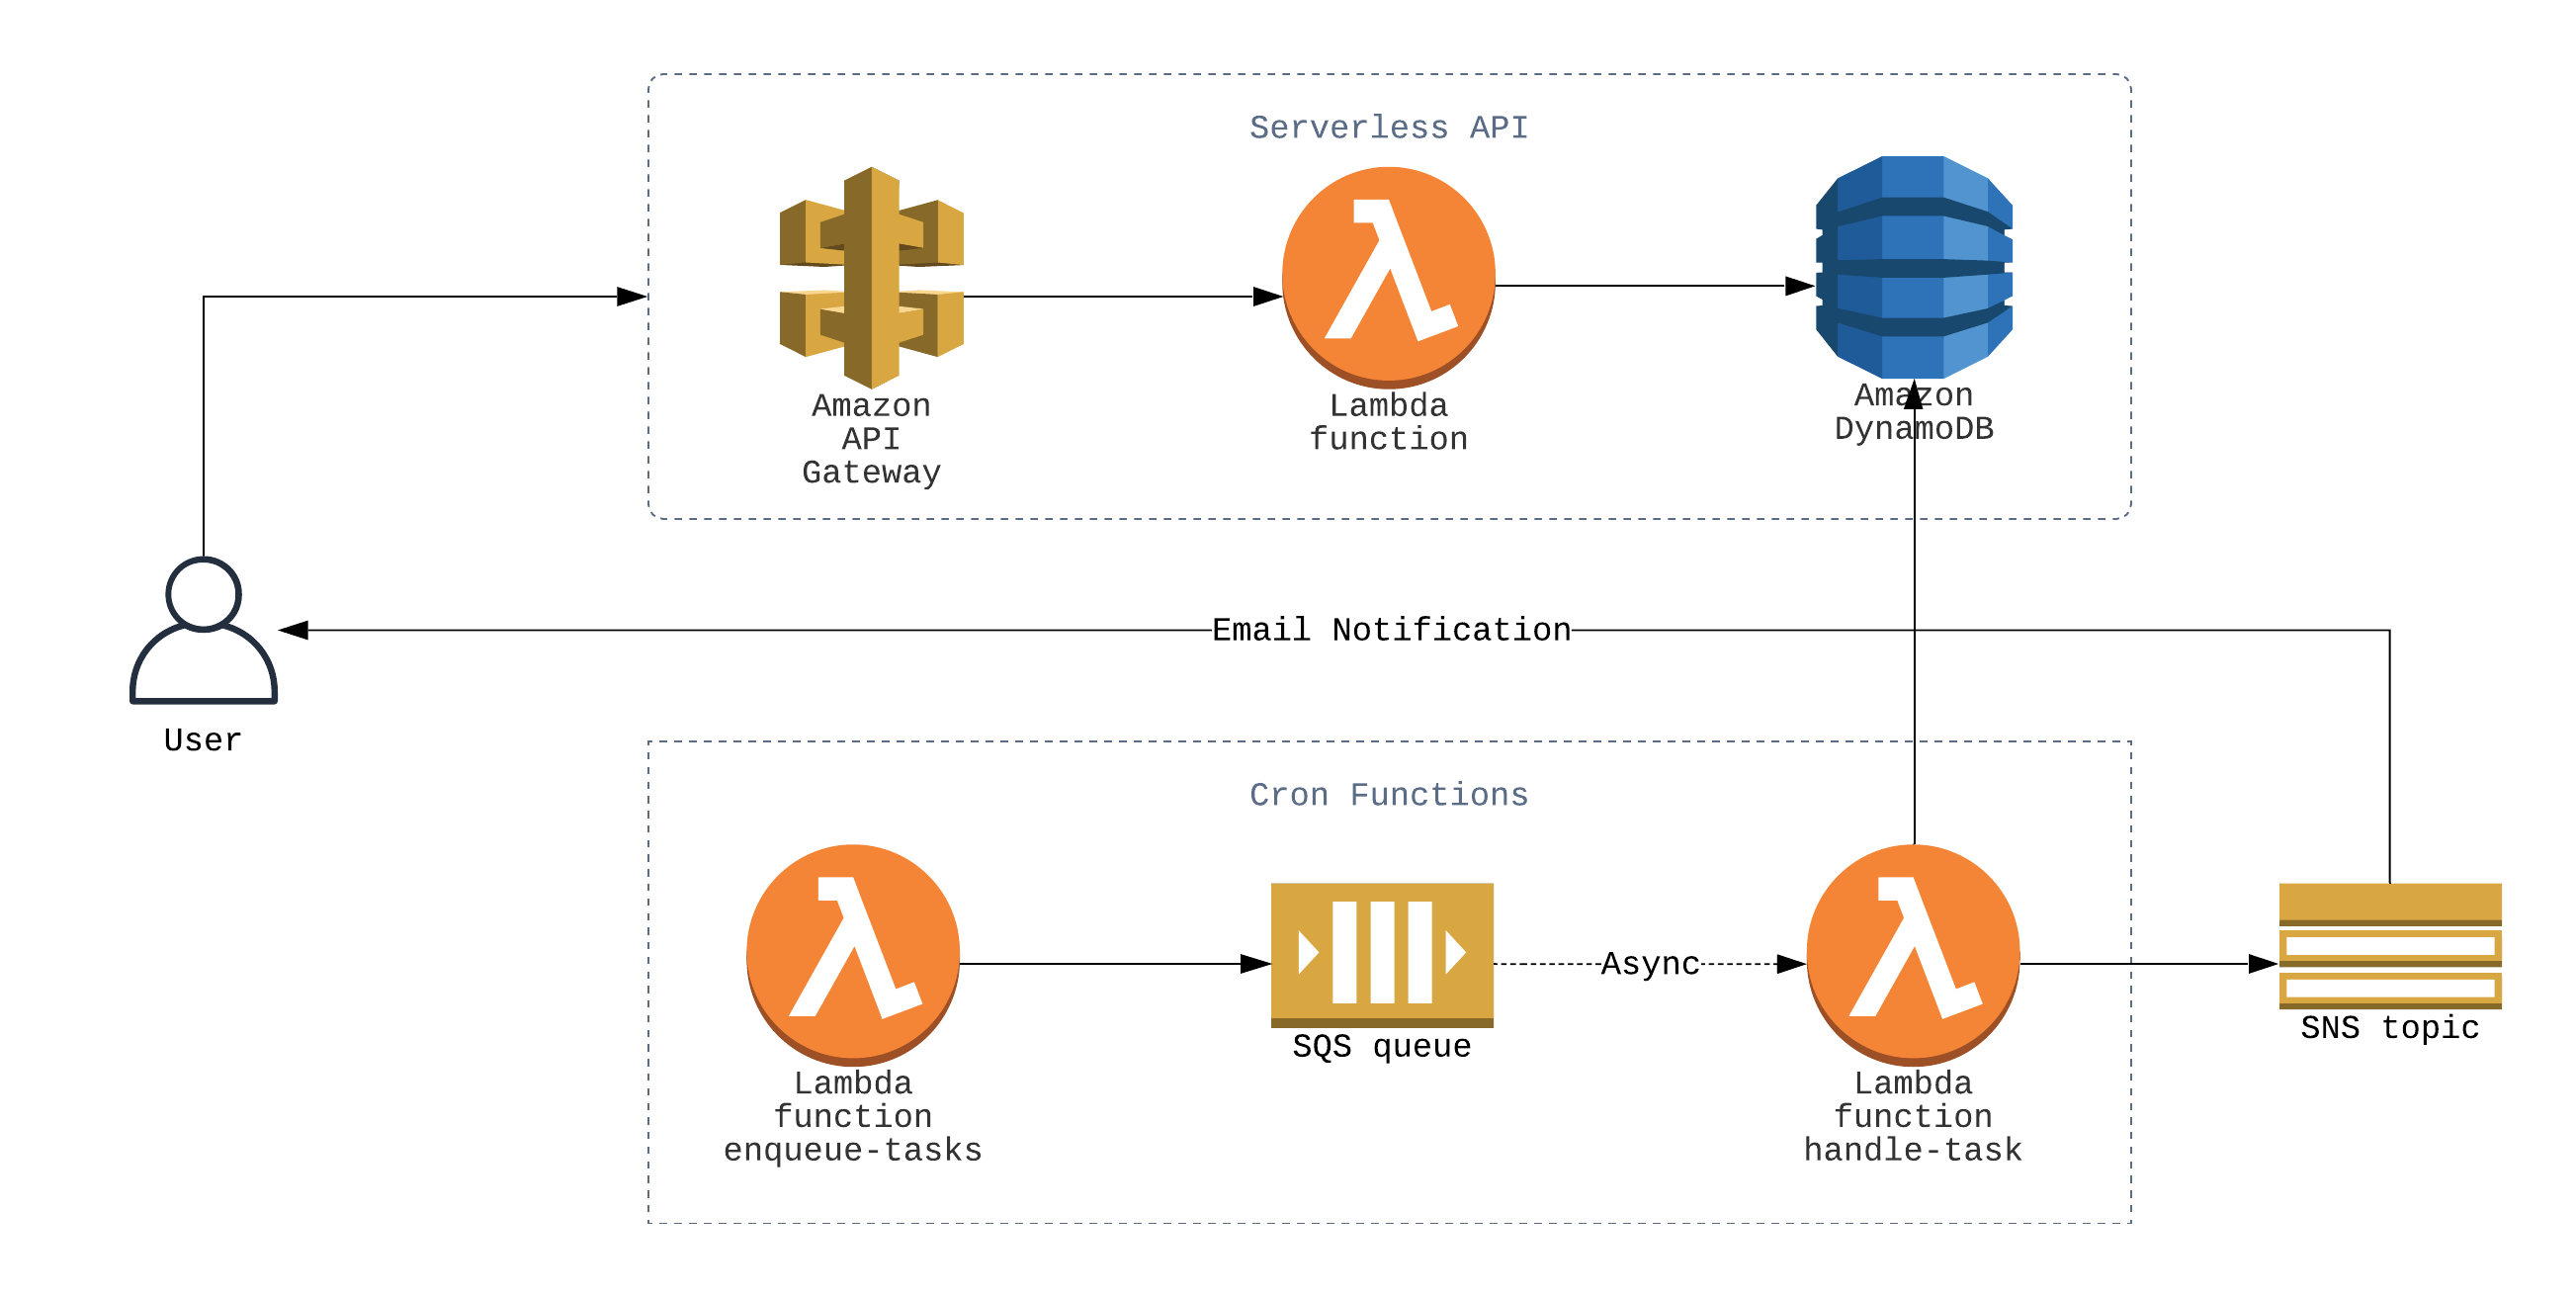
Before I start explaining the application, here’s a simple architecture diagram I made of the whole setup. I’m putting it here at the start rather than the end because I just want to show what’s to come, the article will go into detail about everything.
- Note — You can find the full source code of the application on Github here, you can refer to that as you go through the article.
Application Specifications
From a functional standpoint, the application would do the following
- Track the prices of only the products the users have requested tracking for.
- Send alerts to the users whenever the prices of the products they’re tracking changes.
I decided not to implement any user authentication, as that would increase the complexity a lot. It can always be added later if I feel like it.
As for the technical architecture, the product would be
- Highly scalable.
- Built with AWS using a serverless architecture.
I decided to use Python as the programming language, along with the serverless framework to ease deployment. So without further ado, let’s dive into the core of the discussion, i.e. building the application itself.
Scraping Prices from Amazon and Flipkart
My go-to tools for scraping are requests and lxml. You must have come across requests already, it might be the most popular Python library of all time. But still, if you didn’t know, it’s an HTTP library with a very elegant and easy-to-use interface, and even the Python core team recommends using this over their native HTTP library urllib.request. Using requests we can download the HTML page from the Amazon or Flipkart product page, and then we’ll use lxml to parse the HTML and extract the relevant information from it. There are some alternatives to lxml we could’ve used—beautifulsoup comes to mind—but lxml is much more faster than its competition, mostly because it is a compiled C library at it’s core.
This article is an excellent quickstart guide to scraping using requests and lxml. I’m not going to cover the scraping code I wrote in detail, instead I’m going to cover some interesting problems I faced and how I solved them. If you’re unfamiliar with these libraries or scraping in general, check it out and you’ll be up to speed in no time.
Getting an Unique Product Identifier
I figured I’d need an unique identifier for every product I’ll be tracking. I had noticed that both Amazon and Flipkart uses a product id in their URL, so either I can extract that id from the URL, or I can use the entire URL itself as the identifier. But there is a problem with both of these approaches—I can’t expect an user to give a clean URL as an input to the application, they’ll most likely input URLs with lots of query parameters and tracking codes and what not. For example, this is what a typical input URL might look like
https://www.amazon.in/AmazonBasics-Hard-Camera-Case-Small/dp/B01L0LVDJO?pf_rd_r=P97H15WNVRADNZB27YZJ&pf_rd_p=8867cdc3-4624-428d-8e35-5e1d8221fe8a&pd_rd_r=50e65a90-dc1f-4d36-8736-caea744b47a9&pd_rd_w=FZhh0&pd_rd_wg=6fR1i&ref_=pd_gw_wish
We can’t use this as an unique identifier, as the query parameters will change depending upon various factors. So, we have to extract the core URL without the query parameters, something like the following
https://www.amazon.in/AmazonBasics-Hard-Camera-Case-Small/dp/B01L0LVDJO
You might be thinking, “this is pretty easy, we can just use a URL parsing library to parse the URL and get the parts we want”. And you would be right if it was just query parameters we were dealing with, turns out some Amazon URLs look like the following
https://www.amazon.in/gp/product/B00SHFP99W/ref=ppx_yo_dt_b_asin_title_o02_s00?ie=UTF8&psc=1
Here, the part starting with ref is redundant, despite it not being a query parameter. Also, as you might have noticed, sometimes the URL contains the product name as a slug, sometimes it doesn’t. If we were to do the parsing manually, we would have to take care of all of these fringe cases manually, and even then we could not be sure if covered all cases or not.
Solution: Canonical Link
There is a very simple solution to this problem of getting an unique product URL. You see, search engines faced this problem a long time ago; as soon as websites started using dynamic routing, the URL wasn’t anymore a reliable way of fingerprinting an webpage. That’s why it became industry standard to include a canonical link in every page, which is just a link tag with rel=canonical parameter included in the head section of an webpage. You can read more about canonical link here.
For an Amazon product page, the canonical link tag looks like the following
<link
  rel="canonical"
  href="https://www.amazon.in/Brother-HL-L2321D-Single-Function-Monochrome-Printing/dp/B00SHFP99W"
/>
We can use this canonical link safely as an unique identifier for products, as the responsibility of this being correct now falls on the Amazon developers, not us. Now all that’s left is extracting this link, the following XPath does the job perfectly
//link[@rel="canonical"]/@href
Escaping Bot Detection
Most websites try to stop scraping by using some bot detection techniques. Some of these can be quite sophisticated and hard to get around, but fortunately neither Amazon or Flipkart is using any sophisticated technique.
Whenever you hit any bot detection or captcha page while scraping, the first thing you should pay attention to is your User-Agent string, which is a string the client—usually the web browser—sends to the server in order to identify itself. Libraries like requests send a custom user agent string, so the server might be filtering the traffic using that. So make sure to use a standard user agent string, like that of Chrome, so that your script is not that easily identifiable.
I was getting blocked even after I used the user agent of Chrome, so the next thing I tried was rotating the user agent for each request. I hard coded a list of user agents in my script, and for each request I used a random one from that list. This was enough to get around the bot detection system of both Amazon and Flipkart.
- For reference, you can use this website to get the latest user agents of the popular browsers.
The Application Architecture
Now that we have a script for scraping prices, let’s discuss the core application and its design. As with the previous section, I’m not going to describe the code in detail or go over every part of the application, I’m just going to discuss some scalability issues I faced and the design decisions I made regarding those.
The Database Schema
I decided to use DynamoDB as the database, as far as I know that is the best choice for a completely serverless application.
As for the tables, I started developing the application with a single table, that would contains objects that I dubbed bargain. A typical bargain would look like the following
{
  "bargainId": "339c94149456e5046b2284906c8acac0",
  "email": "sumit@skghosh.me",
  "productTitle": "Quaker Oats, 1.5kg Pack",
  "productUrl": "https://www.amazon.in/Quaker-Oats-1-5kg-Pack/dp/B00L2K9DM8",
  "latestPrice": 234,
  "subscribed": true
}
As you can see, a bargain captures all the information related to a tracking request made by an user. Now having this, a straightforward way of going forward can be like the following: I can schedule a Lambda function to run every 30 minutes or so—the function can just go through all of the bargains in the table one by one, check the price of the product using the productUrl, and the notify email if the new latestPrice is different than the old one. But this will quickly run into scaling issues
- As the number of users and the number of
bargains increase, the same product can be tracked by multiple people. And that means the application will scrape the same product page multiple times. Scraping the product page is a very expensive operation, so this is a inefficiency we need to take care of. - Once the number of
bargains is large enough, the Lambda function will take a long time to complete, and the limit for Lambda execution time is 15 minutes, so we’re quickly going to hit a wall.
Let’s discuss the first issue first. We need to get all the unique productUrls from the table—doing this in a SQL database would be easy enough, but when we’re working with a NoSQL database like DynamoDB it gets a bit complex. DynamoDB doesn’t offer any efficient way to fetch unique attributes from the objects. One way to do it would be getting all the objects, and the doing the deduplication in your code. As we can imagine, this will be pretty inefficient. A better way to do it would be maintaining a separate table for the unique productUrls, and then making sure that table keeps in sync with your main table—either using DynamoDB streams + Lambda, or using client-side code. The former would’ve made the application much more complex than it needs to be, so I went with the latter.
So I created a separate table for product objects, an example would be like the following
{
  "latestPrice": 234,
  "productTitle": "Quaker Oats, 1.5kg Pack",
  "productUrl": "https://www.amazon.in/Quaker-Oats-1-5kg-Pack/dp/B00L2K9DM8"
}
Now with this, whenever I need to scrape prices I can just go through the products table and avoid scraping the same object multiple times.
I wanted to give the users choice to turn their subscription on or off, but then again the same problem of duplication comes into picture, as there will mostly likely be multiple bargains for every user. If I don’t separate out the subscription information in another table, I’ll have to modify multiple objects for every subscription update request, which is inefficient and not cost-effective. So I separated subscriptions into another table too.
{
  "email": "sumit@skghosh.me",
  "subscribed": true
}
With these information separated out into different tables, the main bargain object is left with the following
{
  "bargainId": "339c94149456e5046b2284906c8acac0",
  "email": "sumit@skghosh.me",
  "productTitle": "Quaker Oats, 1.5kg Pack",
  "productUrl": "https://www.amazon.in/Quaker-Oats-1-5kg-Pack/dp/B00L2K9DM8"
}
I had a roadblock while deciding on a primary partition key for the bargain table. I needed an unique value for this, because I wanted the ability to delete individual bargains easily; and there’s also the fact that an uniformly distributed unique partition key increases performance of DynamoDB. Amazon recommends using composite attributes as partition key this for details. So I did just that: I took the md5 hash of the concatenation of the email and productTitle strings, and used it as the bargainId.
Finally, there is the problem of indexing. Looking up all the bargains an user has, i.e. all the products he’s tracking, is an essential function. So is looking up all the users who are tracking a particular product, this will be used by the cron function for sending notifications. But a DynamoDB table offers efficient lookup using only the partition key, to enable lookup by the other keys we’ll have to create global secondary indexes, and that’s exactly what we’re going to do. In our case, bargainId is already the partition key, so we’re going to two global secondary indexes for the email and productUrl keys respectively.
So finally, the Cloudformation templates of the DynamoDB tables look like the following
BargainsDynamoDBTable:
  Type: AWS::DynamoDB::Table
  Properties:
    TableName: ${self:custom.bargainsTableName}
    ProvisionedThroughput:
      ReadCapacityUnits: 1
      WriteCapacityUnits: 1
    AttributeDefinitions:
      - AttributeName: bargainId
        AttributeType: S
      - AttributeName: productUrl
        AttributeType: S
      - AttributeName: email
        AttributeType: S
    KeySchema:
      - AttributeName: bargainId
        KeyType: HASH
    GlobalSecondaryIndexes:
      - IndexName: emailIndex
        KeySchema:
          - AttributeName: email
            KeyType: HASH
        ProvisionedThroughput:
          ReadCapacityUnits: 1
          WriteCapacityUnits: 1
        Projection:
          ProjectionType: ALL
      - IndexName: productUrlIndex
        KeySchema:
          - AttributeName: productUrl
            KeyType: HASH
        ProvisionedThroughput:
          ReadCapacityUnits: 1
          WriteCapacityUnits: 1
        Projection:
          ProjectionType: ALL
SubscriptionsDynamoDBTable:
  Type: AWS::DynamoDB::Table
  Properties:
    TableName: ${self:custom.subscriptionsTableName}
    ProvisionedThroughput:
      ReadCapacityUnits: 1
      WriteCapacityUnits: 1
    AttributeDefinitions:
      - AttributeName: email
        AttributeType: S
    KeySchema:
      - AttributeName: email
        KeyType: HASH
ProductsDynamoDBTable:
  Type: AWS::DynamoDB::Table
  Properties:
    TableName: ${self:custom.productsTableName}
    ProvisionedThroughput:
      ReadCapacityUnits: 1
      WriteCapacityUnits: 1
    AttributeDefinitions:
      - AttributeName: productUrl
        AttributeType: S
    KeySchema:
      - AttributeName: productUrl
        KeyType: HASH
The Flask API
The Flask web-app is pretty standard, mostly consisting of CRUD operations using the boto3 library. Like I said at the start, I’m not going to go into details and explain the code here, I want to keep this article design and architecture oriented only. But if you’re interested you can always go to the Github repo here and take a look at the code. Also, I explained the serverless plugins I’m using for Lambda and DynamoDB deployment in this article, feel free to check that out as I’m not going to reiterate that here.
The Cron Functions
We’ll need a cron function system—and by cron I don’t mean the literal Unix utility, in this article, by “cron function” I’m referring to Lambda functions that are run periodically. We’ll need such a system to update the prices of all the products that are being tracked, and send notifications to the users accordingly. Like we discussed, the straightforward way of doing it is going to hit scaling issues very quickly, so we’ll have to make it more robust than that. Specifically, we need to take care of the second scaling issue I mentioned
- Once the number of
bargains is large enough, the Lambda function will take a long time to complete, and the limit for Lambda execution time is 15 minutes, so we’re quickly going to hit a wall.
To solve this, I went with a decoupled microservices architecture, consisting of two Lambda function and an SQS queue. The first function, enqueue-tasks, goes through the products table, and for every product it pushes a message into the SQS queue containing the product details. And this enqueue-tasks function is set to run periodically, like a cron job.
The second function, handle-task, has the SQS queue as its event source. So whenever a new message comes into the queue, an instance of the function gets triggered with the message as its input. This function is doing the bulk of the labour, it’s scraping prices for a product and sending notifications to all the users who are tracking that product.
As you can imagine, this architecture will be able to scale to very large numbers. The handle-task function instances are being run concurrently, and each instance is scraping only one product. So their individual execution time, as well as total execution time, should be small.
Just for reference, this is how the functions section of my final serverless.yml looks
functions:
  app:
    handler: wsgi_handler.handler
    events:
      - http:
          path: /
          method: ANY
          cors: true
      - http:
          path: "{proxy+}"
          method: ANY
          cors: true
    memorySize: 256
  enqueue-tasks:
    handler: app.enqueue_tasks
    events:
      - schedule: rate(30 minutes)
    memorySize: 256
  handle-task:
    handler: app.handle_task
    reservedConcurrency: 10
    events:
      - sqs:
          batchSize: 1
          arn:
            Fn::GetAtt:
              - TasksQueue
              - Arn
    memorySize: 256
Conclusion
- The API documentation is available @ https://gh.skghosh.me/bargain/swagger/
- The source is available @ Github. Please star it if you find it useful, and feel free to fork, make an issue, send a pull request, all of that.
A lot of improvements can be made to this application, but for now I just wanted a functional prototype that works for my personal use-case. I hope this article helped you in any way it can. And please leave a comment if you have any feedback or suggestion. I’m also planning to write a front end for this using React Native, so stay tuned for that. See you!!