Accessing Linux Partitions from Windows through a VM and Samba
You must’ve faced the problem of accessing Linux partitions—such as ext4—from Windows if you’re running a dual boot setup. There are a few solutions to this ::
- Using free third-party tools such as ext2fsd. The drawback with this approach is that these tools are rarely updated, and potentially unstable.
- Using Linux File Systems for Windows. I’ve read some very good reviews of this solution on Reddit and Stack overflow, and apparently it’s very stable… but it’s not free, so there’s that.
- Running a Linux VM on Windows and using that as a bridge. This approach takes some effort to set-up, but once you’ve set it up, it’s very stable and painless.
This article is going to be a pretty detailed tutorial on the third method. If you want a TLDR of the steps ::
- Create a Linux VM and add the Linux partition as a physical raw disk to that VM.
- Permanently mount that partition in the VM using
/etc/fstab. - Install Samba and set up Samba sharing of the mounted partition. Create a set of Samba client credentials.
- Connect to the Samba server from Windows—by adding it as a network location—using the client credentials created in the last step.
Now that you have the TLDR, below are the steps in detail.
Note — In this article I’ve assumed that the Linux partition is an ext4 one. But this method is not limited to that, it can work with any file system as long as you can mount it on Linux.
Create a Linux VM on your Windows guest
The first step is, obviously, creating the VM that we’re gonna use as the bridge. As for the OS, I’m going to use Ubuntu Server 18.04 LTS; any other Linux distros should work as well, you just might have to tweak the commands a bit.
As I said, I’ll be using VMware Player as the hypervisor. While setting hardware options for the VM, you’ll have to make the ext4 partition available to the VM. In VMware Player we can do this via the following steps ::
- Click on Add ➝ Hard Disk ➝ SCSI ➝ Use a physical disk.
- Select your drive from the drop-down menu, and select the “Use individual partitions” option in the “Usage” section.
- Select the ext4 partition you wanna share and click next.
- Finish the wizard by entering a name for the virtual disk file—you can just go with the default—and clicking “Finish”.
If you did these steps properly, you’d see a second hard disk added to your VM, other than your primary one. You can confirm that by running lsblk, like the following ::
sumit@hal9001:~$ lsblk
NAME   MAJ:MIN RM   SIZE RO TYPE MOUNTPOINT
fd0      2:0    1   1.4M  0 disk
loop0    7:0    0  89.1M  1 loop /snap/core/8268
loop1    7:1    0  91.4M  1 loop /snap/core/8689
sda      8:0    0    10G  0 disk
├─sda1   8:1    0     1M  0 part
└─sda2   8:2    0    10G  0 part /
sdb      8:16   0 465.8G  0 disk
├─sdb1   8:17   0   450M  0 part
├─sdb2   8:18   0   100M  0 part
├─sdb3   8:19   0    16M  0 part
├─sdb4   8:20   0 120.1G  0 part
├─sdb5   8:21   0 282.6G  0 part
└─sdb6   8:22   0  62.5G  0 part
sr0     11:0    1  65.6M  0 rom
sr1     11:1    1   870M  0 rom
For me, the ext4 partition to be shared is labelled as sdb6; note this down as it might be different for you.
Set up mountpoint
Now we have to mount the partition on our Ubuntu Guest. We’re gonna add an entry to /etc/fstab so that it gets mounted automatically at the time of boot.
For that, you’ll have to create a mountpoint—which is nothing but a directory—where the ext4 partition will be mounted. I’ll be creating mine at /media/mntsdb6.
sumit@hal9001:~$ sudo mkdir /media/mntsdb6
Then add the following line to /etc/fstab using your favorite text editor ::
/dev/sdb6 /media/mntsdb6 ext4 rw,nosuid,nodev,relatime 0 0
Once you’re happy with your mount settings, run the following command to mount.
sumit@hal9001:~$ sudo mount -a
Set up Samba sharing
Samba is the most straightforward way of setting up network based file-sharing between a Windows system and a Linux one. Samba is a free-software implementation of the SMB networking protocol that Windows uses for sharing files, printers etc over a network. So by setting up our Linux VM as a Samba server, we can connect to that from our Windows system easily.
First of all, install Samba on the Ubuntu system ::
sumit@hal9001:~$ sudo apt install samba
After the installation is done, we have to make some changes to the Samba config file, /etc/samba/smb.conf. But before doing that, let’s keep a copy of the original, just in case things go wrong. This is always a good practice.
sumit@hal9001:~$ cd /etc/samba/
sumit@hal9001:/etc/samba$ sudo cp smb.conf smb.conf.original
Now, add the following lines to /etc/samba/smb.conf ::
[SambaShare]
path = /media/mntsdb6
public = no
writable = yes
printable = no
Then restart the samba daemon so that the changes take effect.
sumit@hal9001:/etc/samba$ sudo service smbd restart
sumit@hal9001:/etc/samba$ sudo service smbd status
● smbd.service - Samba SMB Daemon
   Loaded: loaded (/lib/systemd/system/smbd.service; enabled; vendor preset: enabled)
   Active: active (running) since Tue 2020-03-03 11:46:36 UTC; 9s ago
     Docs: man:smbd(8)
           man:samba(7)
           man:smb.conf(5)
 Main PID: 3400 (smbd)
   Status: "smbd: ready to serve connections..."
    Tasks: 4 (limit: 2290)
   CGroup: /system.slice/smbd.service
           ├─3400 /usr/sbin/smbd --foreground --no-process-group
           ├─3426 /usr/sbin/smbd --foreground --no-process-group
           ├─3427 /usr/sbin/smbd --foreground --no-process-group
           └─3430 /usr/sbin/smbd --foreground --no-process-group

Mar 03 11:46:36 hal9001 systemd[1]: Stopped Samba SMB Daemon.
Mar 03 11:46:36 hal9001 systemd[1]: Starting Samba SMB Daemon...
Mar 03 11:46:36 hal9001 systemd[1]: Started Samba SMB Daemon.
Lastly, you’ll have to create a client account for the Samba server, just run the smbpasswd command like the following, replacing sumit with your username. It’ll prompt you for a new password; you’ll need that later for connecting to this Samba server from Windows.
sumit@hal9001:~$ sudo smbpasswd -a sumit
New SMB password:
Retype new SMB password:
Added user sumit.
sumit@hal9001:~$ sudo pdbedit -L
sumit:1000:Sumit Ghosh
Connect to the Samba server from Windows
For this step, you’ll need the IP address of your Linux VM. You can get that by running ip a ::
sumit@hal9001:~$ ip a
1: lo: <LOOPBACK,UP,LOWER_UP> mtu 65536 qdisc noqueue state UNKNOWN group default qlen 1000
    link/loopback 00:00:00:00:00:00 brd 00:00:00:00:00:00
    inet 127.0.0.1/8 scope host lo
       valid_lft forever preferred_lft forever
    inet6 ::1/128 scope host
       valid_lft forever preferred_lft forever
2: ens33: <BROADCAST,MULTICAST,UP,LOWER_UP> mtu 1500 qdisc fq_codel state UP group default qlen 1000
    link/ether 00:0c:29:bc:46:4d brd ff:ff:ff:ff:ff:ff
    inet 192.168.13.129/24 brd 192.168.13.255 scope global dynamic ens33
       valid_lft 1777sec preferred_lft 1777sec
    inet6 fe80::20c:29ff:febc:464d/64 scope link
       valid_lft forever preferred_lft forever
You can see that in my case, the IP is 192.168.13.129. Note down yours.
Now, once you have the IP of your Linux VM, go to your Windows host and do the following ::
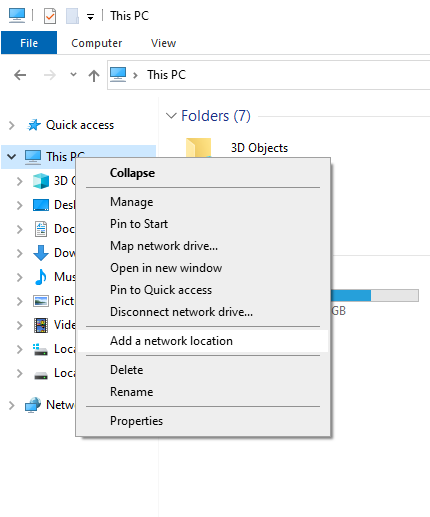
- Select “Add a network location” from the context menu you get on right-clicking on “This PC”, see the screenshot below for reference.
- A wizard will open up. Select Next ➝ Choose a custom network location.
- Enter
\\192.168.13.129\\SambaShare\in the “Internet or network address” box and click “Next”. It goes without saying that you put the IP you noted down in there instead of mine. - Finish the wizard by clicking Next ➝ Finish.
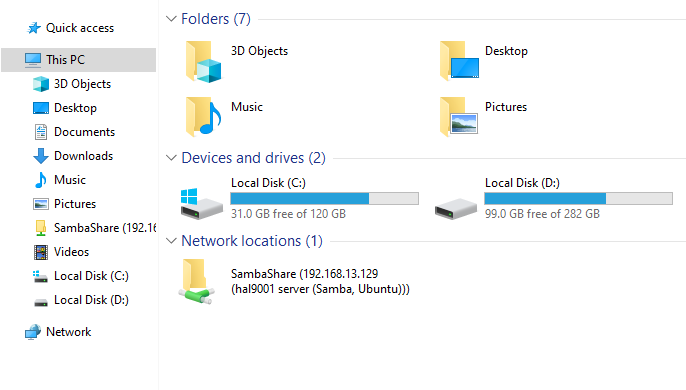
Once it’s added, it’ll ask you for credentials; enter the username and password you set up in the previous step using smbpasswd. And voila, you’ll get your samba drive mounted as a network location!!
Potential Drawbacks
- If you don’t have enough hardware, such as RAM, to afford to keep a VM running at all time, this method is not for you.